Ordergroove will use a unique value to identify your merchant within our platform.
| Name | Description | Value | Placeholder |
| Merchant ID | Ordergroove's identifier of you in our system | To Be Provided | <MERCHANT_ID> |
Each instance of the BigCommerce-Ordergroove app is identified by an app client ID and a hash key that are generated during the draft app creation process. You will reference these values in the front-end code after providing them to Ordergroove during setup.
| Name | Description | Value | Placeholder |
| Client ID | Client ID for the BC-OG App | <draft_app_client_id_value> | |
| Store Hash Key | BigCommerce Store Hash Key | ||
| Global Offer ID | Incentive ID on OG's Database |
Front end scripts, API endpoints, and other URLs
Note: If you are working in a local environment, Ordergroove may not function as intended. To guarantee performance, Ordergroove recommends working directly in the BigCommerce theme.
|
Environment
|
Staging
|
Production
|
Placeholder
|
|---|---|---|---|
| Front-end script tags | https://staging.static.ordergroove.com | https://static.ordergroove.com | <STATIC_DOMAIN> |
| Subscription creation | https://staging.sc.ordergroove.com | https://sc.ordergroove.com | <SC_DOMAIN> |
| API endpoints | https://staging.v2.ordergroove.com/ | https://api.ordergroove.com/ | <API_DOMAIN> |
| SFTP Drop-Off | staging.feeds.ordergroove.com/incoming | feeds.ordergroove.com/incoming | <SFTP_DROP_SITE> |
| Middleware URL | https://<middlewareUrl>-bc.stg.ordergroove.com/ | https://<middlewareUrl>-bc.ordergroove.com/ | <middlewareUrl> |
Subscription Creation, API endpoints, and SFTP Drop-off will need to be configured within the BigCommerce App UI under Ordergroove Endpoints as shown below:
App Install Instructions
Step 1: Create a Draft App in BigCommerce dev tools
Note: This step must be performed using the BigCommerce account having the “owner” role (the Store Owner) since the BigCommerce Draft App is tied to the user account, and a BigCommerce App can only be installed by the account having the “owner” role.
If you are already logged into the BigCommerce store, the devtools site should recognize this and take you directly to the page.
Navigate here and log in using your BigCommerce login credentials, which are the same credential for logging into your store.
-
App Summary Tab
- All information on the tab is optional for a Draft App. However, you may wish to update the App Summary section with a meaningful name and image. This is the information that will be displayed in the Admin Console / My Apps section.
-
Details Tab
- All information on this tab is optional for a Draft App.
-
Technical Tab
- App Type
- Multiple users: Multiple Users
- App Type: Single Click
- App Type
Callback URLs
| Callback | Staging | Production |
|---|---|---|
| Auth | To be provided by Ordergroove | To be provided by Ordergroove |
| Load | To be provided by Ordergroove | To be provided by Ordergroove |
| Uninstall | To be provided by Ordergroove | To be provided by Ordergroove |
OAuth Scope
Ordergroove suggests configuring your OAuth scopes as shown in the below image.
If you see OAuth scope settings that are not in the image below, please leave them set to the defaults.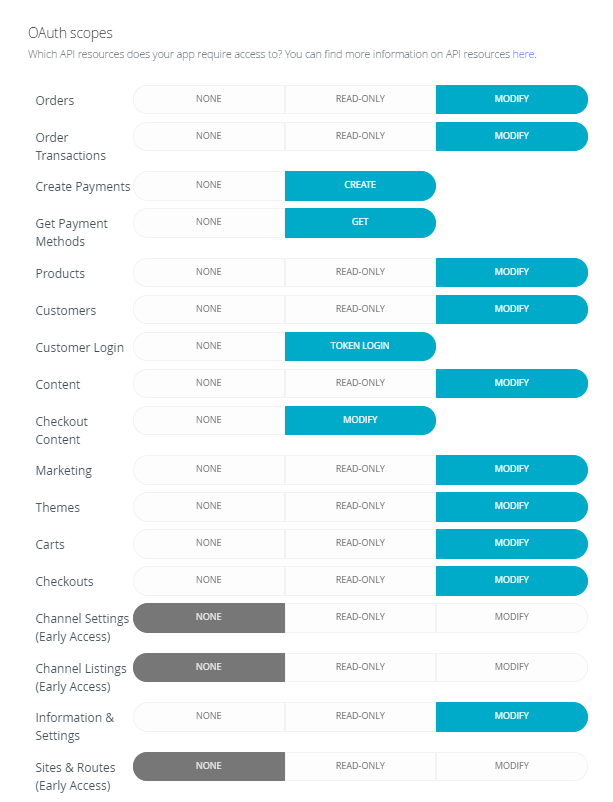
When finished selecting, click the Update and Close button at the bottom of the page.
Step 2: Get Client ID and Client Secret Key, provide to Ordergroove

- Click on View Client ID and provide the Client ID and Client Secret to your Ordergroove contact. Please send this information over the SFTP or through a password-protected file.
- Ordergroove will add this information to the App database.
- Your Ordergroove contact will notify you the update has been made. Keep in mind that, until values have been configured in Ordergroove's app, you cannot proceed.
- Once that values have been configured, proceed with installing the app.
Step 3: Install the App
Note: This step must be performed using the BigCommerce account having the “owner” role (the Store Owner) since the BigCommerce Draft App is tied to the user account, and a BigCommerce App can only be installed by the account having the “owner” role.
- In the Admin Console of the store, navigate to Apps / My Apps and click on the My Draft Apps tab. Your new draft app should be available.
- Click on the draft app you created and then select Install. A verification screen will be shown.
- Click the checkbox to accept and select Confirm. The BigCommerce-Ordergroove Integration App Admin Console will appear on a successful install.
- At this point, it is helpful to provide Ordergroove with access to your store — and the Ordergroove app — if you have not already done so. This will allow for faster confirmation on configuration and more direct resolution on troubleshooting should the need arise.
App Configurations
To configure your App with your Ordergroove settings once installed, click the gear icon in the upper right-hand corner of the main interface — next to your User information — as shown below.
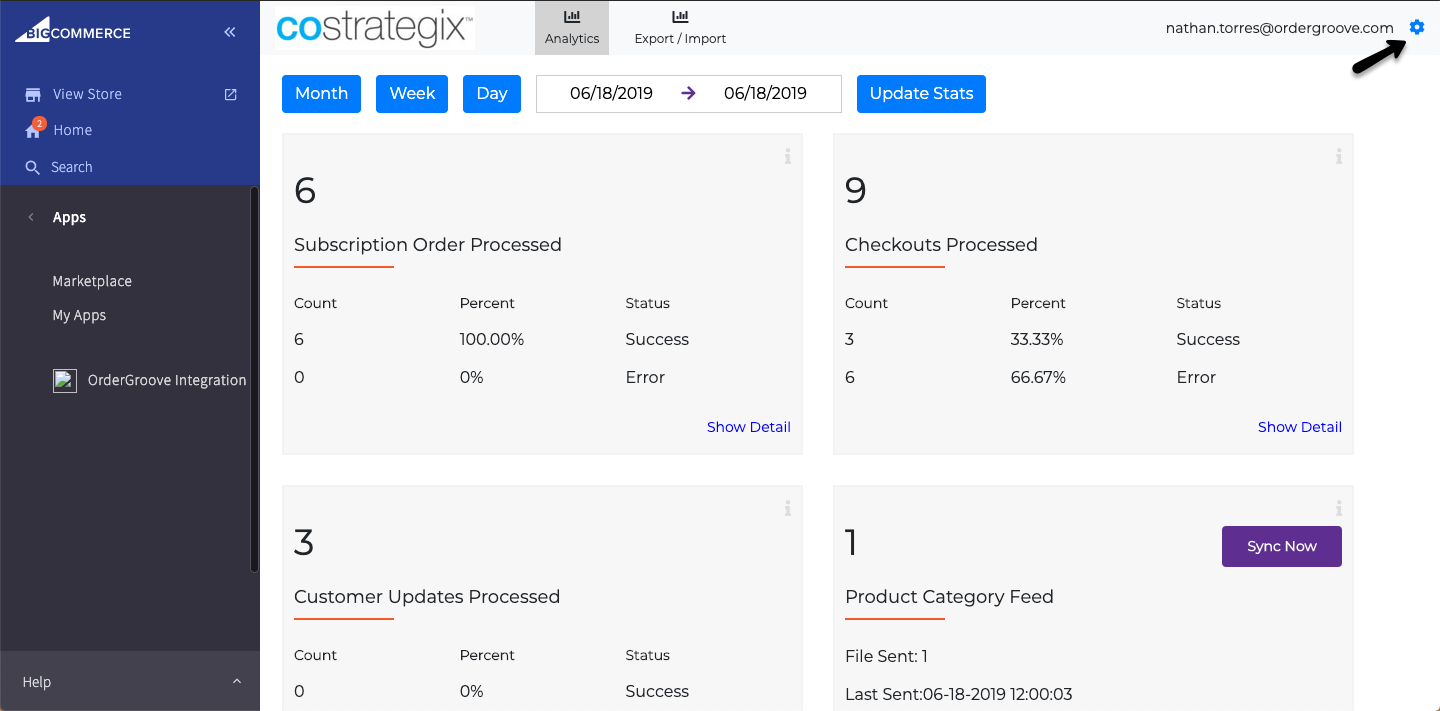
Once clicked, you will be redirected to a page as shown below, the fields will need to be filled in with merchant-specific information. Ordergroove will provide your merchant user ID within the Integration Guide document. The Merchant Secret Key will be dropped on their respective SFTP due to its sensitive nature and will need to be retrieved by you.
The SFTP credentials will be provided by Ordergroove as well. All components will need to be entered into the app once installed, and saved.
-
Subscriptions Owned By
In the 'Subscriptions Owned By' section, select BigCommerce.
Select "Incentive Groups" and apply the Global Offer ID provided by your Ordergroove representative. This allows Ordergroove to apply incentives to recurring orders created by BigCommerce-hosted subscription offers. -
Free Shipping
If you are leveraging free shipping for your program on recurring orders, you will then need to add a free shipping coupon in BigCommerce. Once the coupon code is generated, add the coupon name to the App console. To add the coupon to the App Console, navigate to the bottom of the App settings UI, under Free Shipping Coupon, select the checkbox next to 'Free Shipping Coupon', add the coupon name you created in BigCommerce to the free text field (as shown below), and select 'Delete coupons after use'.
Once complete, notify Ordergroove via a Support ticket, as our team will need to update a setting to enable the free shipping flag to be passed within the Order XML.
Create Theme JSON values for handlebars syntax
Note: This step must be performed using the BigCommerce account having the “owner” role (i.e. the Store Owner) since theme files are read-only for non-owners.
- In the BigCommerce app, go to Storefront > My Themes > Customize.
- In the navigation, click Edit Theme Files.
- Select "config.json" (which will be read-only if not performed by store owner)
- Add the following JSON elements to "Settings" (add values for each element from merchant details) and save.
"api_middleware_url": "<middlewareUrl>",
"store_hash": "<storeHashKey>",
"devtools_client_id": "<ClientId>",
"ordergroove_auth_url": "https://staging.static.ordergroove.com/<MERCHANT_ID>/auth.js,
Offers
Product Modifier
You must use the BigCommerce Admin Portal to configure product modifiers and associated discounting rules for each subscription-eligible product. Configuring the product modifiers will allow enable users to opt-in to subscriptions, and allow the Client to set up discount rules around the initial subscription order purchase.
Since products that are not subscription eligible may also have product modifiers configured for them, there is an associated configuration that must be done within the app console. The export/Import .CSV file enables the Client to differentiate the subscription-related modifiers from the other configurations. Once a product modifier has been configured for a product, a new .CSV export will need to be generated using the app console so that the information from the newly created product modifier is available in the file. Multiple product modifiers can be created in the BigCommerce Admin Portal before generating a new export, but the product modifier information for each subscription eligible product must be in the export file in order to complete the configuration.
The 'Autoship Eligible' and 'Subscription Frequency' fields within the .CSV export must be configured in order for subscription opt-in and creation to work properly.
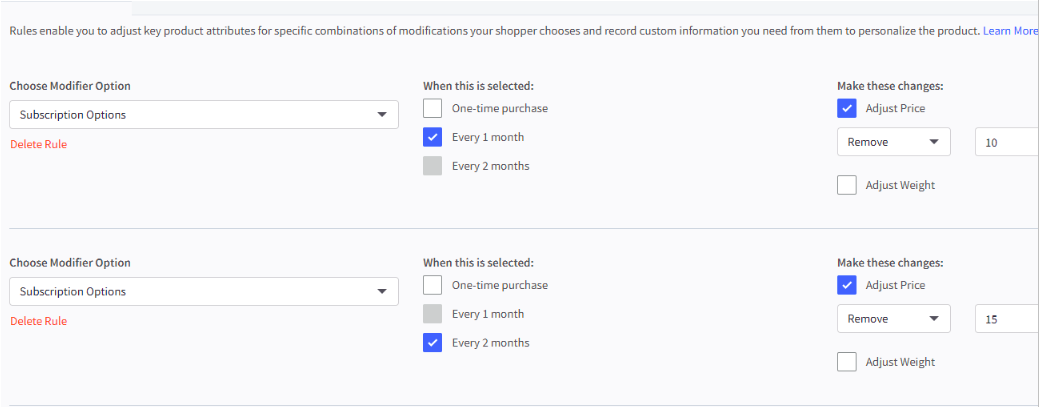
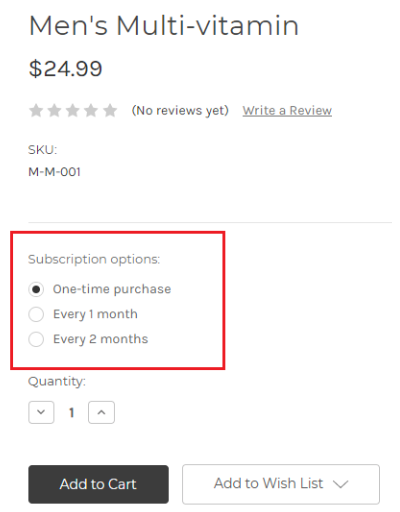
Note: The "Name" free text box for the offer (as seen in the below screenshot) must include the word 'Subscription' as the BigCommerce App is listening for product modifiers associated with subscriptions.
The "Required" checkbox should be left unchecked, as recurring subscription orders will not include this value.
The following screenshots show a typical product modifier configuration with associated rules for a subscription eligible product:

Product Feed Configuration
In order for Ordergroove to understand your product catalog, you must configure the products by exporting a .CSV file in the app's Import/Export tab.
Autoship Eligible
The Autoship Eligible column within the app .CSV export configuration determines if a product is eligible to be subscribed to, and it must be set to “True” in order for a product to be considered subscription eligible.
All other subscription-related configuration settings will be ignored if this is “False”.
If the product is subscription eligible, set to "True"
If the product IS NOT subscription eligible, set it to "False". If the product is set to "False" all other subscription-related configurations will be ignored.
- The client must first configure the product modifier for the subscription eligible product within the BigCommerce Admin Portal (as shown in the examples above).
- After configuring the product modifiers within BigCommerce, navigate the export/import tab within the app console and click "Initiate Export". Once the job has been completed, click "Download .csv File" to view the .CSV configuration file
- Open the file and assign a "TRUE" or "FALSE" value in each product row.
Frequency
The Frequency column within the app .CSV export configuration determines the available frequency options available for a product, along with any product-specific default frequencies you may have configured in the product modifiers
The Frequency field is also used to associate subscription frequency information for each of the product modifier options that were configured using the BigCommerce Admin Portal.
- The client must first configure the product modifier for the subscription eligible product within the BigCommerce Admin Portal (as shown in the examples above).
- After configuring the product modifiers within BigCommerce, navigate the export/import tab within the app console and click "Initiate Export". Once the job has been completed, click "Download csv File" to view the .csv configuration file
- Open the file and find the "Frequency" column to set the appropriate "every" and "every_period" values for each product row. Please note that each frequency option will need to have an "every" and "every_period" value.
- A JSON value will already be populated in this field based on your product modifier configurations with the BigCommerce Admin Portal. Below is an example of this configuration:
- A JSON value will already be populated in this field based on your product modifier configurations with the BigCommerce Admin Portal. Below is an example of this configuration:
Note: Line breaks have been added for readability — every and every_period will default to 0, which is an invalid configuration. Please ensure all values are updated appropriately.
[{'Name':'One-time purchase';'option_id':132;'every':0;'every_period':0;'is_default':'TRUE'};
{'Name':'Every 1 month';'option_id':133;'every':0;'every_period':0;'is_default':'FALSE'};
{'Name':'Every 2 months';'option_id':134;'every':0;'every_period':0;'is_default':'FALSE'}]- By default, all of the "every" and "every_period" values will be set to "0" in the .CSV.
Client must configure each "every" and "every_period" value, otherwise subscription creation will fail.- Please use the table below as a guide to set the "every" and "every_period" values for each subscription frequency option for each product.
- Additionally, the default frequency, or, the frequency option that's set on page load must be designated for a single frequency option. Keep in mind that only one frequency can be set for a product.
- Once the "every" and "every_period" values are set, the JSON string should look like this:
[{'Name':'One-time purchase';'option_id':132;'every':0;'every_period':0;'is_default':' TRUE'};
{'Name':'Every 1 month';'option_id':133;'every':1;'every_period':3;'is_default':'FALSE'};
{'Name':'Every 2 months';'option_id':134;'every':2;'every_period':3;'is_default':'FALSE'}]
Frequency Options Table
| every | every_period | End Result |
| 30 | 1 | 30 days |
| 60 | 1 | 60 days |
| 90 | 1 | 90 days |
| 1 | 2 | 1 week |
| 2 | 2 | 2 weeks |
| 3 | 2 | 3 weeks |
| 1 | 3 | 1 month |
| 2 | 3 | 2 months |
| 3 | 3 | 3 months |
Note: The one-time purchase option must always be set to "every"=0 and "every_period"=0
Once you have finished the eligibility and frequency configuration for each product, save the .CSV and import in the app using the "import" feature.
Checkout and Discounts
Alternative payment methods will need to be blocked or hidden upon customer checkout with subscription-eligible items. Additionally, guest checkout will need to be blocked when subscription eligible items are in the customer's cart and the customer will need to be prompted to either login or create an account.
Block Alternative Payment
Force user to use a payment method that supports card vaulting (i.e., block PayPal, Amazon, etc)
BigCommerce stores may be configured to offer multiple payment methods at checkout. However, only a subset of payment methods in BigCommerce support stored credit cards, a requirement for the Ordergroove platform to process payments in BigCommerce. Therefore, any other payment methods the store offers, such as PayPal, Apple Pay, or Amazon Pay, must be suppressed when the shopper has a subscription product in their cart.
-
Force user to save a credit card on checkout
- When a shopper is checking out with a subscription product in their cart, they must be compelled to store their credit card or to use a previously stored credit card.
-
Prevent removal of payment methods on checkout
- The checkout page provides a “Manage” link that a shopper can use to remove their stored payment methods. This link should be removed, or customized to prevent the removal of stored payment methods when the shopper has an active subscription, or they are purchasing a subscription product.
- The checkout page provides a “Manage” link that a shopper can use to remove their stored payment methods. This link should be removed, or customized to prevent the removal of stored payment methods when the shopper has an active subscription, or they are purchasing a subscription product.
Block Guest Checkout
The most readily available way to achieve this requirement is to disable guest checkout globally in BigCommerce. If disabling guest checkout is not an option, the checkout page must be customized to force login when a subscription product is detected in the cart:
-
Detect subscription products in the cart.
- Read if a product in the cart has a subscription modifier to identify if a customer is checking out with subscription items.
-
Force Login
- If the client-side scripting detects a subscription product in the cart, shoppers must be required to log in or create an account before completing payment.
-
Prevent Logout
- If the client-side scripting detects a subscription product in the cart, and the customer is logged in, the shopper should not be able to log out from the checkout page. By default, the Optimized One Page Checkout presents a Sign Out button. This button should be removed, or logout should be prevented before payment another way.
- If the client-side scripting detects a subscription product in the cart, and the customer is logged in, the shopper should not be able to log out from the checkout page. By default, the Optimized One Page Checkout presents a Sign Out button. This button should be removed, or logout should be prevented before payment another way.
Subscriber Status API
Ordergroove provides a Subscriber Status API to communicate to the front-end code whether the logged-in user is an existing active subscriber. This can be used to prevent the removal of a default credit card for an active subscriber. Calling the backend API from the frontend code typically would require exposing the Ordergroove API security credentials in the code. For this reason, the Ordergroove BigCommerce App exposes an endpoint, which utilizes the same JWT security as documented in the og_oauth section, and the App calls the OG Subscriber Status API on the backend, thereby providing a more secure integration of the Ordergroove API.
The response mimics the Ordergroove Subscriber Status values, documented here for convenience:
| Status code | Status | Description |
| 1 | Active subscriber | The customer has at least one active subscription |
| 0 | Inactive subscriber | The customer has no active subscriptions, and at least one inactive subscription |
| -1 | Non-subscriber | The customer does not exist, or has no subscriptions |
Code Example
// 1. OnLoad of payment methods list page
// Call OrderGroove to know if subscription present for this payment ID
functioncheckOrderGrooveSubscription(token) {
    varmiddlewareUrl ="{{theme_settings.api_middleware_url}}";
    varappClientId ="{{theme_settings.devtools_client_id}}";

    return
    fetch('https://'+middlewareUrl+'/api/v1/ordergroove/customer/has_subscriptions', {
    'headers':{
        'Accept':'application/json',
        'Content-Type':'application/json',
        'authorization-client': appClientId,
        'Authorization':'BigCommerce',
        'signed-payload': token
        }
    });
}

// 2. function checkOrderGrooveSubscription called from checkAndSubmit function.
// OnClick Of Delete Button
    functioncheckAndSubmit(identifier) {
        varformIndex = identifier.getAttribute("data-button-index");
        varisDefaultPayment =false;
        varisDefaultPaymentTrue =false;
        isDefaultPayment = identifier.getAttribute("data-is-default");
        isDefaultPaymentTrue = (isDefaultPayment ==='true');
        varform = document.getElementById("paymentMethod-form-"+ formIndex);
        console.log("token value "+ jwtToken);
        console.log("isDefaultPayment "+ isDefaultPayment);
        console.log("isDefaultPaymentTrue value "+ isDefaultPaymentTrue);
        if(! isDefaultPaymentTrue) {
        form.submit();
        returntrue;
    }

    console.log("isDefaultPayment check over");

    if(jwtToken !=='')
        { checkOrderGrooveSubscription(jwtToken)
        .then(function(response){
        response.json().then(function(data) {
        varresponseData = data;
        console.log("response data "+ JSON.stringify(responseData));
        varstatusValue = responseData['status'];
        console.log("status value is "+ statusValue);
            if(statusValue ==true) {
            // Show Error popup, Not Allowed to delete
            document.getElementById("showErrorPop").value = 1;
            varelement = document.getElementById('showErrorPop');
            varevent =newEvent('change');
            element.dispatchEvent(event);
            // .trigger('change');
            returnfalse;

            }else{
            // Allow to Delete
            form.submit();
                returntrue;
            }
        });
    });

    // console.log("API response " + JSON.stringify(apiResponse));

    }else{
        console.log("Token not generated.");
    }
}
Subscription Manager
Create a new page under your site's My Account section to hold the Subscription Manager. This URL should redirect to the login page if the user is not logged in.
Please add the following div to the page:
<div id="og-msi"></div>Please add the following script tags to the page, but only if the user is logged in:
<script type="text/javascript" src="<STATIC_DOMAIN>/<MERCHANT_ID>/msi.js"></script>
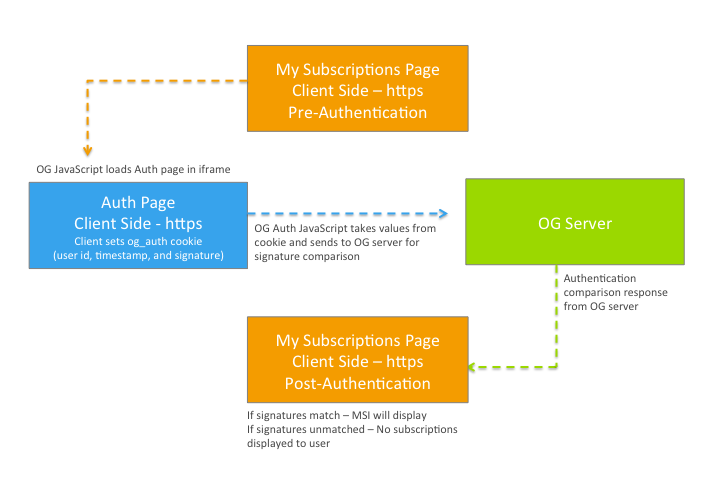
Steps for Ordergroove to load the Subscription Manager
- The browser loads the Subscription Manager by visiting the page URL, which must be HTTPS in order to load.
- The merchant's server returns the Subscription Manager with the Ordergroove javascript and div tag if the user is logged in.
- The Ordergroove javascript — on the Subscription Manager browser page — loads a hidden iframe to the merchant's auth page. The Auth page must be HTTPS and on the same root domain as the Subscription Manager.
- On page load, the merchant creates a signature with the user_id and timestamp as specified below. The merchant sets the signature, the user_id, and the token as a "secure" cookie, but not an "HTTP only" cookie. The path of the cookie should be "/".
- The Subscription Manager browser page retrieves the signature from the secure cookie and uses it to make the necessary API calls.
- The Ordergroove server returns the appropriate response if the signature matches and the timestamp is within the last two hours.
Add Subscription Manager to My Account portal
Subscribers use the Subscription Manager to view and manage their active subscriptions. Customers expect this page to be in their My Account portal. There are multiple ways to achieve this. You may add the Subscription Manager to an existing page in the account portal, or, create a new web page and add it to the account portal navigation.
The following approach is one suggested way to accomplish the new web page creation, but you may choose an alternate approach.
-
Create a Custom Page Template in the Stencil theme.
File names and locations may change depending on the base theme in use. The following steps are written assuming Cornerstone as the base theme.
- After creating the empty template, begin by copying the content from an existing template used in the My Account portal, such as templates/pages/account/orders/all.html to maintain the same look and feel as other pages in the portal.
- Replace the content of the main content container element with the markup for the Subscription Manager. For example, in Cornerstone this element contains the main page content in templates/pages/account/orders/all.html:
<div class="account-body"></div> - Optionally, wrap the content of the page in a conditional flow Handlebars helper that checks to see if the customer is logged in. Pseudo-code example:
{{#if customer}}
...display msi
{{else}}
...handle guest shoppers (optionally, redirect to login page with JS)
{{/if}} -
Create a Web Page in the BigCommerce store.
- When creating the page, set This Page Will to Contain content created using the WYSIWYG editor below
- Add a page title and customize the URL as desired
- Uncheck yes, show this web page on the navigation menu under Navigation Menu Options.
-
Map the Custom Template to the Web Page
- Update the .stencil file in the Stencil theme to map the custom template to the web page URL.
- Update the .stencil file in the Stencil theme to map the custom template to the web page URL.
- Update the navigation element for the My Account portal.
File names and locations may change depending on the base theme in use. The following steps are written assuming Cornerstone as the base theme.-
In the custom page template, update the invocation of the My Account Portal navigation to pass in a custom value for account_page. Example:
-
{{> components/account/navigation account_page='msi'}}
-
-
In the custom page template, update the invocation of the My Account Portal navigation to pass in a custom value for account_page. Example:
-
- Add a heading name to the lang file:
- In lang/en.json (and any other language files needed), add a key to represent the msinavigation heading, and a value for the heading text. In this example, the key msi is added with a value of “Manage Subscriptions”
- In the navigation component (templates/components/account/navigation.html by default), add a new element to navigate to the Subscription Manager.
- Use the value for account_page added to the custom page template to conditionally render a clickable link, or non-clickable list item.
- Use the key added to en.json for the text.
- Use the Web Page’s URL as the value of the href property. Example:
{{#if account_page '===' 'msi'}}
    <li class="navBar-item is-active">{{lang 'account.nav.msi'}}</li>
{{else}}
    <li class="navBar-item">
        <a class="navBar-action" href="/account/manage-subscriptions">{{lang 'account.nav.msi'}}</a>
    </li>
{{/if}}
- Add a heading name to the lang file:
og_auth Cookie & Signature Creation
The og_auth cookie should be set upon user login for the standard BigCommerce pages.
Create a page in templates/components/common/og-auth.html containing the code below:
<!-- Modify the value of the header tag below, as appropriate -->
<h1 style="display:none">MyProject</h1>

<!-- Custom Script for og_auth cookie set on the page -->

<script type="text/javascript">


    function setOgAuthCookie() {
        //This is app Client Id, to get the JWT token
        var appClientId = "{{theme_settings.devtools_client_id}}";
        var xmlhttp = new XMLHttpRequest();


        xmlhttp.onreadystatechange = function() {
            if (xmlhttp.readyState == 4 ) {
                if (xmlhttp.status == 200) {
                    var token = xmlhttp.responseText;
                    var customerObj = JSON.parse(atob(token.split('.')[1]));
                        var customerId = customerObj.customer.id;


            if (customerId) {
                var timestampValue = Math.round(Date.now() / 1000);
                var message = customerId + "|" + timestampValue;


                getSignatureValueFromMiddleware(token)
                .then(function(response){
                    response.json().then(function(data) {
                        console.log(JSON.stringify(data, null, 3))
                        var responseData = data;

                        var signatureValue = decodeURIComponent(responseData['data']);

                        var cookieValue = message + "|" + signatureValue;
                        if(signatureValue) {
                        setCookie('og_auth', cookieValue, 2); // setCookie function call
                        } else {
                        console.log('Signature From middleware is false. ');
                         }
                    })
                 });
            } else {
                console.log('customerId not set');
             }


             } else if (xmlhttp.status == 404) {
                console.log('Not logged in!');
                setCookie('og_auth', '', -1);
            } else {
                console.log('Something went wrong' + "please check og auth file in common component");
         }
     }
 };
            xmlhttp.open("GET", "/customer/current.jwt?app_client_id="+appClientId, true);
            xmlhttp.send();
 }

    // Call Middleware API with customer Token and
    //    get the signature value for og_auth cookie
    function getSignatureValueFromMiddleware(token) {
        var middlewareUrl = "{{theme_settings.api_middleware_url}}";
        var appClientId = "{{theme_settings.devtools_client_id}}";

        var timestampValueForApi = Math.round(Date.now() / 1000);
        return fetch('https://'+middlewareUrl+'/api/v1/merchant/ordergroove/signature?ts=' + timestampValueForApi, {
            'headers':{
                'Accept':'application/json',
                'Content-Type': 'application/json',
                'authorization-client': appClientId,
                'Authorization': 'BigCommerce',
                'signed-payload': token
            }
         });
     }
        // Function to set Cookie
        function setCookie(cname, cvalue, exdays) {
            var d = new Date();
            d.setTime(d.getTime() + (exdays*24*60*60*1000));
            var expires = "expires="+ d.toUTCString();
            document.cookie = cname + "=" + cvalue + ";" + expires + ";secure ;path=/";
    }
    // Function to delete cookie
    var delete_cookie = function(name) {
        document.cookie = name + '=;expires=Thu, 01 Jan 1970 00:00:01 GMT;';
    };
    setOgAuthCookie(); // Call to the main function
</script>
The og-auth.html code needs to be added to each of the files listed below. Insert the following handlebars syntax at the bottom of each listed file.
{{> components/common/og-auth}}- templates/pages/account/orders/all.html
- templates/components/account/orders-list.html
- templates/pages/auth/account-created.html
- templates/pages/auth/login.html
- Setting up your Authentication Page (blank page with no html)
- Must NOT require logging in to view
- Must be HTTPS
- Must have relative path of /og-auth-msi/. The path must be the same in all environments.
- Set relative path in Ordergroove RC3.
- Set relative path in Ordergroove RC3.
Push to Production
After the development work is complete, here are the steps required to launch Ordergroove into a production environment.
Payment Gateway Configuration
Please note that all subscription creation tests require that the payment is made via a configured sandbox gateway. Purchases made using BigCommerce's "Test Payment Gateway" will fail to create subscriptions as this test gateway does not send payment info to Ordergroove.
Note: Ordergroove clients can only have one store tied to an app, and clients cannot use the same app across multiple QA and UAT stores.
-
QA: Staging Signoff
During this phase, Ordergroove will provide a QA document that you will need to complete. If any issues are identified, they will be fixed in staging before the merchant is live in production. The standard QA process takes 2-3 weeks.
-
UAT: Production Signoff
After QA is complete, you will need to push all code changes related to the integration to your production environment (production store). You will need to make the following updates:
-
- Install a new draft app. Repeat the App Installation instructions using the Production Call back URLs
- Update the theme config.json file with the following:
- Production App <ClientId>
- Change the middleware URL from https://-bc.stg.ordergroove.com/ to https://-bc.ordergroove.com/
- Update the App configurations with the Production credentials
- Use <MERCHANT_ID>
- Change Ordergroove Secret Key from Staging '<value>' to Production '<value>'
- Change Ordergroove API Endpoint from 'https://staging.v2.ordergroove.com' to 'https://api.ordergroove.com'
- Change Ordergroove Subscription API Endpoint from 'https://staging.sc.ordergroove.com/' to https://sc.ordergroove.com/'
- Change Server Address from 'staging.feeds.ordergroove.com' to 'feeds.ordergroove.com'
- Change Server Password from Staging '<value>' to Production '<value>'
- Frontend Page Tagging: Change any reference of 'https://staging.static.ordergroove.com' to 'https://static.ordergroove.com' on all pages.
After the push to production is complete, Ordergroove will provide a production sign-off checklist that must be completed and approved by Ordergroove.
For additional information on parts of the integration that do not require any configuration or development work, please request more information through your Ordergroove Support contact.
Items not included in this documentation that are automated include:
-
- HMAC Authentication
- AES Encryption
- Ordergroove cookies
- Product Feed
- Product Categories Feed
- Purchase POST (Subscription Creation)
- Order Placement
- Customer Update API (Email Address Updates)
- Payment Update API (Default Payment Updates)